Posts

Showing posts with the label Angular

JWT Authentication and Authorization with Python Flask and Angular: Complete Guide

Image
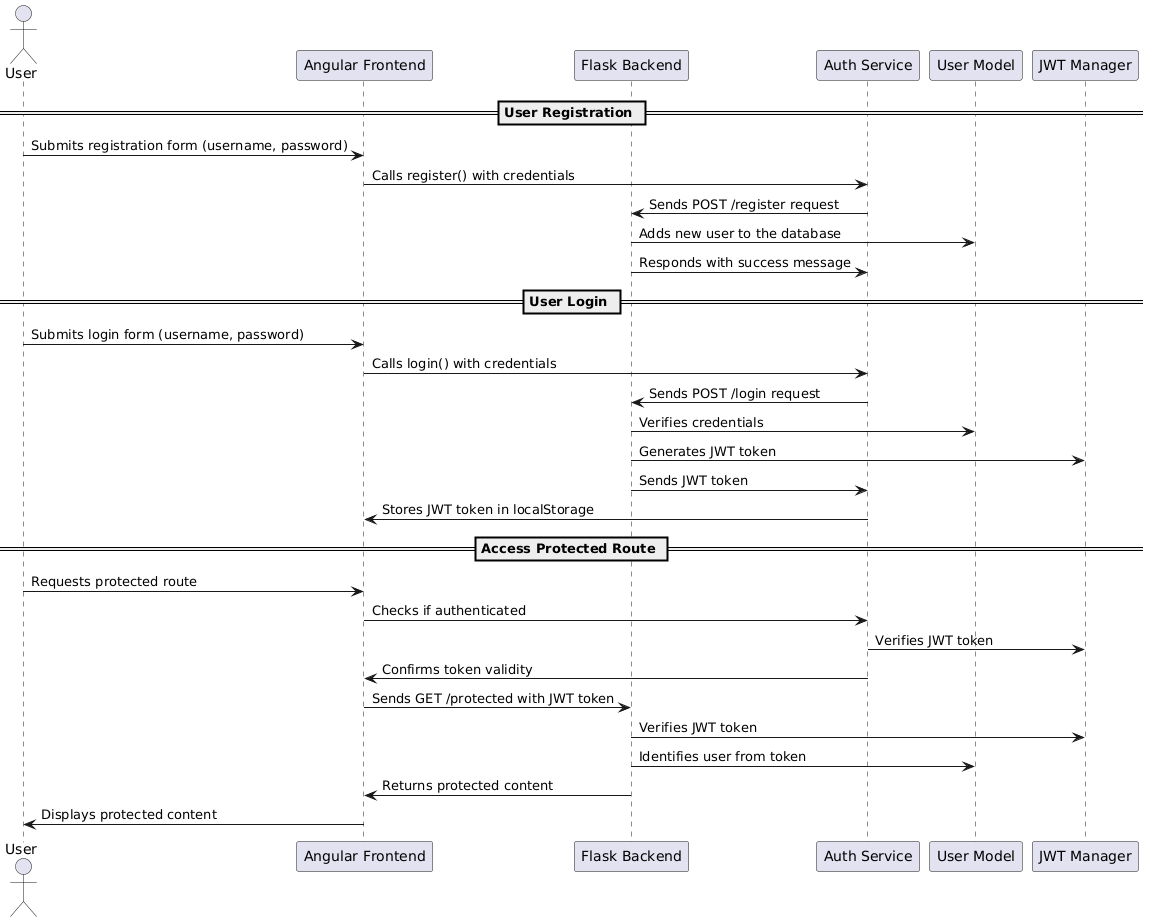
Explanation of Flow: User Registration : The user submits the registration form in the Angular frontend, which sends the details to the AuthService . The AuthService then communicates with the Flask backend to register the user and receives a success response. User Login : The user submits the login form, and the Angular frontend calls the AuthService with the login credentials. The AuthService sends these credentials to the Flask backend, where they are verified against the UserModel . If successful, Flask generates a JWT token using JWTManager , sends it back to the AuthService , which stores the token in localStorage . Accessing Protected Route : The user tries to access a protected route. Angular checks if the user is authenticated by verifying the JWT token stored in localStorage . Angular sends the token in the request to Flask. Flask verifies the token using JWTManager and, if valid, returns the protected content to Angular, which then displays it to the user. This sequence ...

Secure Laravel Backend and Angular Frontend with Okta

Image
To integrate Okta authentication and authorization in an application with Laravel (backend) and Angular (frontend), you need to set up both the backend and the frontend to properly handle the authentication and authorization flow. Below are the general steps to integrate Okta with Laravel and Angular. 1. Setting Up Okta Create an Okta Developer Account: Go to Okta Developer and create a free account. Once logged in, create an Okta Application: For Angular (Frontend) : Choose an OAuth 2.0 application with the SPA (Single Page Application) option. For Laravel (Backend) : Choose an OAuth 2.0 or OpenID Connect application for API access. Take note of the following credentials: Client ID Client Secret (for backend) Issuer URL (e.g., https://{yourOktaDomain}/oauth2/default ) 2. Integrating Okta in the Angular Frontend Install Okta SDK in Angular: Install the required Okta SDK for Angular: npm install @okta /okta-angular @okta /okta-auth-js Configure Okta in Angular: In your app.module...

Secure Your Spring Boot Backend and Angular Frontend with Okta

Image
Securing a Spring Boot backend and Angular frontend with Okta involves integrating authentication and authorization into both the backend and frontend using Okta's Identity Management platform. Here's a step-by-step guide: Backend (Spring Boot with Okta OAuth2 Integration) 1. Set Up Okta Developer Account Go to Okta Developer and create an account. Once logged in, create a new OAuth 2.0 Application in the Okta dashboard: Choose Web as the platform. Set up the Redirect URI to http://localhost:8080/login/oauth2/code/okta for local development. Set Grant Type to Authorization Code . After creating the app, note the Client ID , Client Secret , and Issuer URL (e.g., https://dev-XXXX.okta.com/oauth2/default ). 2. Add Dependencies to pom.xml Add the required dependencies for Spring Security OAuth2 and Okta to your pom.xml : <dependencies> <dependency> <groupId> org.springframework.boot </groupId> <artifactId> spring-boot-sta...

Simple CRUD Application using Ktor and Angular

Image
To implement a simple CRUD (Create, Read, Update, Delete) application using Ktor 3 (a Kotlin web framework) for the backend and Angular for the frontend, follow these general steps: 1. Backend Setup (Ktor) 1.1. Create a Ktor 3 Project First, create a Ktor project. You can use the Ktor project generator ( https://start.ktor.io/ ) or manually set up the project with Gradle or Maven. Ensure you have the required dependencies for Ktor 3, such as: ktor-server-core ktor-server-netty (for the server) ktor-server-content-negotiation (for JSON serialization) ktor-server-cors (for cross-origin requests) 1.2. Install Dependencies Add the necessary dependencies in the build.gradle.kts file: plugins { kotlin( "jvm" ) version "1.9.0" id ( "io.ktor.plugin" ) version "3.0.0" } dependencies { implementation( "io.ktor:ktor-server-core:3.0.0" ) implementation( "io.ktor:ktor-server-netty:3.0.0" ) implementation( ...

Node.js, Angular, MongoDB: Develop a User Registration & Login System

Image
To create a registration and login system using Node.js and Angular,  follow these steps. This guide assumes you have Node.js , Angular , and MongoDB (for storing user data) installed. 1. Set up the Backend (Node.js with Express) a. Initialize Node.js project Create a new directory for your project and navigate into it. mkdir node -angular-auth cd node -angular-auth Initialize a new Node.js project. npm init -y Install necessary packages. npm install express mongoose bcryptjs jsonwebtoken body-parser cors b. Create the server In the root directory, create a server.js file. // server.js const express = require ( 'express' ); const mongoose = require ( 'mongoose' ); const cors = require ( 'cors' ); const bodyParser = require ( 'body-parser' ); const User = require ( './models/User' ); const jwt = require ( 'jsonwebtoken' ); const bcrypt = require ( 'bcryptjs' ); const app = express(); const PORT = process.env.PORT ||...