JWT Authentication and Authorization with Python Flask and Angular: Complete Guide
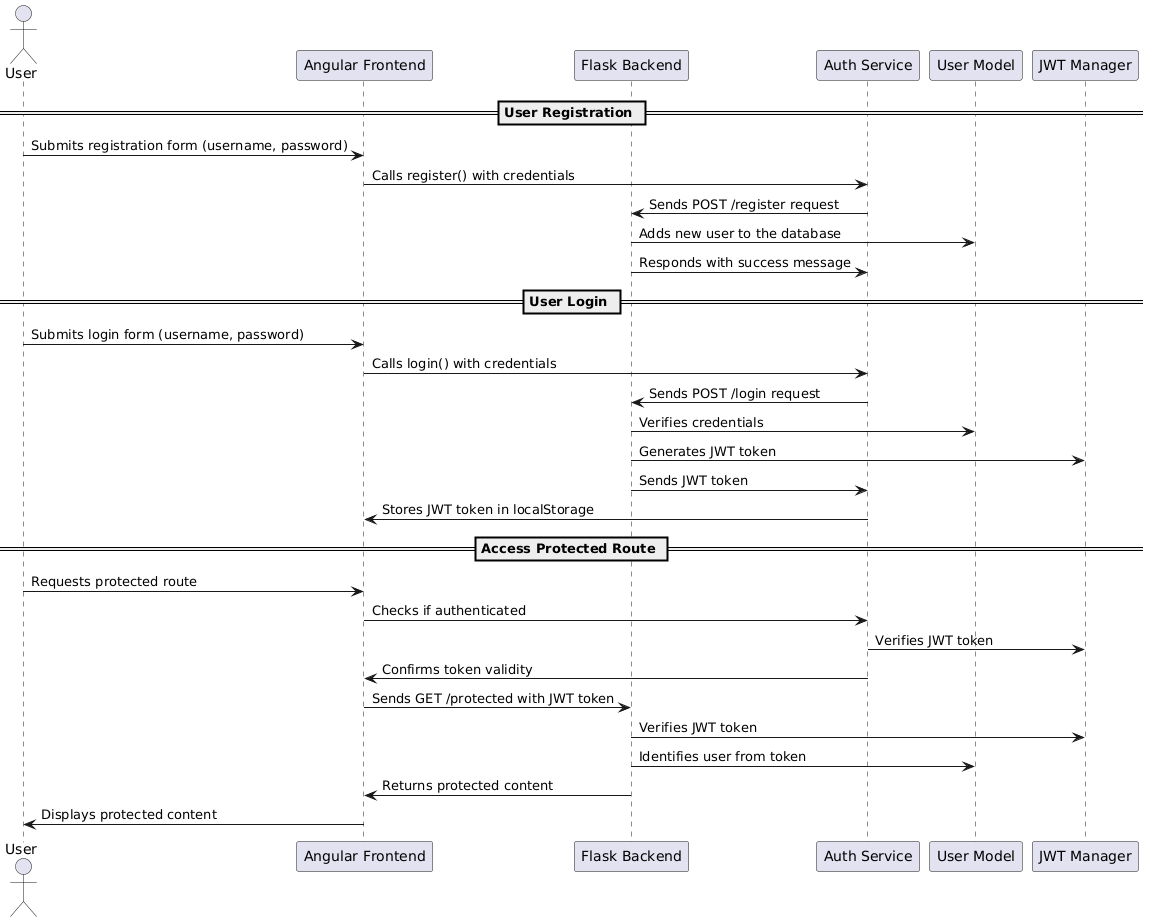
Explanation of Flow:
User Registration:
- The user submits the registration form in the Angular frontend, which sends the details to the
AuthService. - The
AuthServicethen communicates with the Flask backend to register the user and receives a success response.
- The user submits the registration form in the Angular frontend, which sends the details to the
User Login:
- The user submits the login form, and the Angular frontend calls the
AuthServicewith the login credentials. - The
AuthServicesends these credentials to the Flask backend, where they are verified against theUserModel. - If successful, Flask generates a JWT token using
JWTManager, sends it back to theAuthService, which stores the token inlocalStorage.
- The user submits the login form, and the Angular frontend calls the
Accessing Protected Route:
- The user tries to access a protected route. Angular checks if the user is authenticated by verifying the JWT token stored in
localStorage. - Angular sends the token in the request to Flask. Flask verifies the token using
JWTManagerand, if valid, returns the protected content to Angular, which then displays it to the user.
- The user tries to access a protected route. Angular checks if the user is authenticated by verifying the JWT token stored in
This sequence diagram helps visualize the entire JWT-based authentication and authorization flow between the frontend and backend.
Here's a step-by-step guide to implement JWT Authentication and Authorization with Python Flask for the backend and Angular for the frontend.
1. Set Up Python Flask Backend
1.1 Install Required Packages
Start by setting up the virtual environment and installing the necessary libraries:
1.2 Set Up Flask Application
Create the Flask app structure.
1.3 Flask Configuration (config.py)
Configure the Flask app with JWT settings.
1.4 Database Model (models.py)
Create a simple User model for registration and login.
1.5 Flask App (app.py)
Set up the routes for registration, login, and protected routes using JWT.
1.6 Run the Flask App
Now, run the Flask app:
Your backend is ready to authenticate and authorize users using JWT.
2. Set Up Angular Frontend
2.1 Install Angular CLI and Create Project
If you haven’t already, install Angular CLI and create a new project.
2.2 Install Dependencies
Install the @auth0/angular-jwt library to help with JWT handling in Angular.
2.3 Create AuthService for JWT Handling
In your Angular project, create a service to manage authentication.
Edit auth.service.ts to handle login and token storage.
2.4 Create Auth Interceptor
To automatically send the JWT token with requests, create an HTTP interceptor.
In auth.interceptor.ts, intercept requests and add the JWT token in the authorization header.
2.5 Update App Module
Modify app.module.ts to include the interceptor and other necessary modules.
2.6 Create Login and Registration Components
Create components for login and registration forms.
For login.component.ts, use the AuthService to log in users.
2.7 Protect Routes
Use route guards to protect specific routes (e.g., /protected).
In auth.guard.ts, check if the user is authenticated.
localStorage, sends it with requests, and uses route guards to protect specific pages.


