Spring AI: Build AI-Driven Applications with Spring Boot and Azure OpenAI
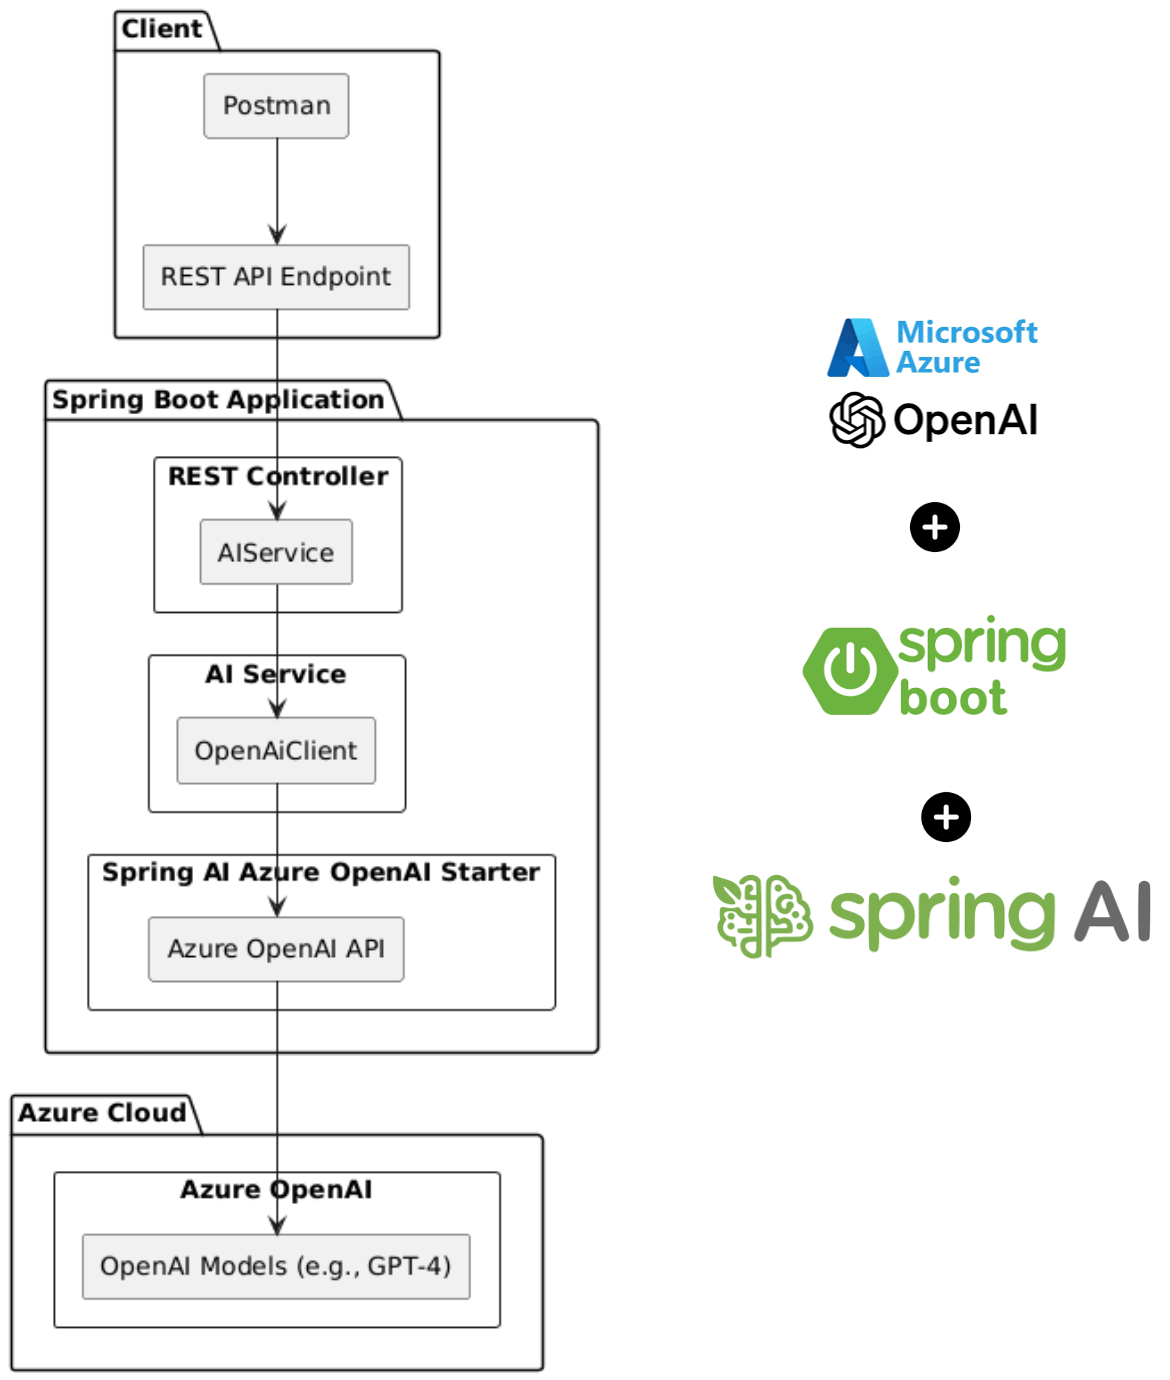
The flow of interaction:
- Postman sends a request to the REST API.
- The REST Controller delegates the request to the AI Service.
- The AI Service uses the OpenAiClient (provided by Spring AI Azure OpenAI Starter) to call the Azure OpenAI API.
- The Azure OpenAI API interacts with the underlying AI models to generate a response, which is sent back to the client.
Tools and Technologies Overview
- Spring Boot: A Java-based framework for building production-ready applications quickly and efficiently.
- Azure OpenAI: A cloud-based AI service providing access to advanced language models such as GPT-3.5 and GPT-4.
- Spring AI Azure OpenAI Starter: A Spring Boot starter that simplifies integration with Azure OpenAI services.
- Maven: A build automation tool for managing dependencies and building the project.
- Postman: A tool for testing REST APIs during development.
Artificial Intelligence (AI) is revolutionizing how applications are built, offering intelligent features like natural language processing, chatbots, and content generation. With Spring Boot, a robust Java framework, and Azure OpenAI, a powerful AI service, you can create scalable and AI-driven applications seamlessly. This guide walks you through building an AI-enabled application from scratch, leveraging Spring Boot's simplicity and Azure OpenAI's advanced models like GPT-4.
1. Setup Your Spring Boot Project
Create a new Spring Boot project using Spring Initializr or your favorite IDE.
- Add the following dependencies:
- Spring Web
- Azure OpenAI
Complete pom.xml:
2. Configure Application Properties
Add the required configuration to your application.properties or application.yml file.
For Azure OpenAI, you'll need:
- Azure OpenAI API key
- Endpoint URL
- Model Name (e.g.,
gpt-4orgpt-3.5-turbo)
Here’s an example configuration for application.properties:
3. Find Your Azure OpenAI API Key and Endpoint
- Log in to the Azure Portal.
- Search for Azure OpenAI in the services and select your resource.
- Navigate to the Keys and Endpoint section.
- Copy your API key and endpoint URL.
4. Create an AI Service
Create a service class to interact with the Azure OpenAI API using Spring AI.
5. Build a REST Controller
Expose an endpoint for your application.
6. Test the Application
Run your Spring Boot application and test the endpoint.
URL:
http://localhost:8080/api/ai/askMethod:
POSTRequest Body:
Response:
Notes:
- Replace
<your-azure-openai-api-key>and<your-resource-name>with actual values. - Ensure your API key is stored securely, e.g., using environment variables or a secrets manager.
To access the source code or download the project, visit the GitHub repository:
🔗 GitHub - Spring AI Demo Project
Feel free to clone or fork the repository to get started quickly!
Get Your Copy of Spring AI in Action Today!
🚀 Don’t miss out on this amazing opportunity to elevate your development skills with AI.
📖 Transform your Spring applications using cutting-edge AI technologies.
🎉 Unlock amazing savings of 34.04% with our exclusive offer!
👉 Click below to save big and shop now!
🔗 Grab Your 34.04% Discount Now!
🔗 Grab Your 34.04% Discount Now!


