Deploying Kotlin Ktor application on AWS Elastic Beanstalk using GitHub Actions

Here’s a step-by-step guide to creating a Kotlin Ktor project and deploying it on AWS Elastic Beanstalk using GitHub Actions.

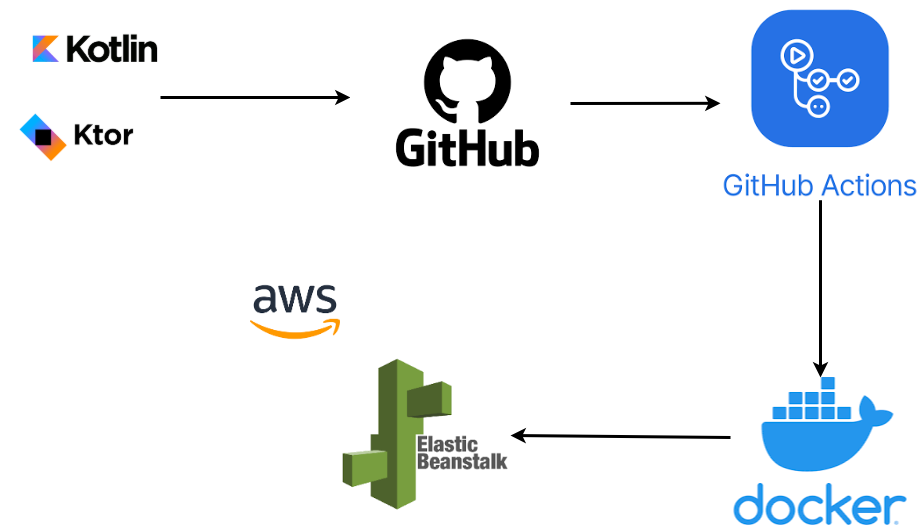
Here is the general architecture diagram that we will be deploying.


1. Create a Kotlin Ktor Project

  1. Set up the project:

    • Use the Ktor Project Generator to generate a starter project.
    • Choose:
      • Build System: Gradle (Kotlin DSL)
      • Engine: Netty
      • Add features like Serialization, ContentNegotiation, and Routing.
  2. Directory structure: Extract and open the project in your IDE (e.g., IntelliJ IDEA).

  3. Application entry point: Update the Application.kt file to define routes. Example:

    import io.ktor.application.*
    import io.ktor.response.*
    import io.ktor.routing.*
    import io.ktor.server.engine.*
    import io.ktor.server.netty.*
    
    fun main() {
        embeddedServer(Netty, port = 8080) {
            routing {
                get("/") {
                    call.respondText("Hello, AWS Elastic Beanstalk!")
                }
            }
        }.start(wait = true)
    }
  4. Build and test: Run the application locally with:

    ./gradlew run

2. Prepare for Deployment to AWS Elastic Beanstalk

  1. Install AWS CLI and Elastic Beanstalk CLI: Ensure you have the AWS CLI and the Elastic Beanstalk CLI installed. Authenticate using:

    aws configure
  2. Create a Dockerfile: Elastic Beanstalk supports Docker deployments. Create a Dockerfile in the root directory:

    FROM amazoncorretto:17
    WORKDIR /app
    COPY build/libs/*.jar app.jar
    ENTRYPOINT ["java", "-jar", "app.jar"]
  3. Add a .ebextensions directory (Optional): Customize your Elastic Beanstalk environment by adding configurations inside the .ebextensions/ directory.

  4. Build the JAR: Add the following task to your build.gradle.kts for building a fat JAR:

    tasks {
        val fatJar by creating(Jar::class) {
            group = "build"
            archiveBaseName.set("app")
            archiveVersion.set("1.0")
            duplicatesStrategy = DuplicatesStrategy.EXCLUDE
    
            manifest {
                attributes["Main-Class"] = "com.example.ApplicationKt"
            }
    
            from(configurations.runtimeClasspath.get().map { if (it.isDirectory) it else zipTree(it) })
            with(tasks.jar.get() as CopySpec)
        }
    }

    Build it using:

    ./gradlew fatJar

3. Create an Elastic Beanstalk Environment

  1. Initialize Elastic Beanstalk:

    eb init
    • Select your AWS region.
    • Choose Docker as the platform.
  2. Create an environment:

    eb create ktor-env

4. Set Up GitHub Actions for CI/CD

  1. Create a GitHub Actions workflow file: Add a .github/workflows/deploy.yml file:

    name: Deploy to AWS Elastic Beanstalk
    
    on:
      push:
        branches:
          - main
    
    jobs:
      deploy:
        runs-on: ubuntu-latest
    
        steps:
          - name: Checkout code
            uses: actions/checkout@v3
    
          - name: Set up JDK
            uses: actions/setup-java@v3
            with:
              distribution: 'corretto'
              java-version: '17'
    
          - name: Cache Gradle dependencies
            uses: actions/cache@v3
            with:
              path: ~/.gradle/caches
              key: ${{ runner.os }}-gradle-${{ hashFiles('**/*.gradle*', '**/gradle-wrapper.properties') }}
              restore-keys: |
                ${{ runner.os }}-gradle-
    
          - name: Build the application
            run: ./gradlew fatJar
    
          - name: Build Docker image
            run: docker build -t ktor-app .
    
          - name: Deploy to Elastic Beanstalk
            env:
              AWS_ACCESS_KEY_ID: ${{ secrets.AWS_ACCESS_KEY_ID }}
              AWS_SECRET_ACCESS_KEY: ${{ secrets.AWS_SECRET_ACCESS_KEY }}
              AWS_REGION: us-east-1
            run: |
              eb deploy
  2. Add AWS credentials to GitHub: Go to your repository settings → Secrets and variables → Actions, and add:

    • AWS_ACCESS_KEY_ID
    • AWS_SECRET_ACCESS_KEY

5. Test the Deployment

  1. Push your code to the main branch.
  2. GitHub Actions will automatically build and deploy your application to Elastic Beanstalk.
  3. Access your application using the Elastic Beanstalk environment URL.

By following these steps, you’ll have a Kotlin Ktor application deployed to AWS Elastic Beanstalk with a fully automated GitHub Actions pipeline. 

🌟 Master Kotlin with Kotlin in Action, Second Edition 🌟

Unlock the power of Kotlin and elevate your programming skills! This comprehensive guide offers practical tutorials, real-world examples, and the latest Kotlin features to help you build efficient, modern applications like a pro. 🚀

🔥 Exclusive Deal Alert! Save a massive 34% today! 🎉 Don’t miss out on this chance to learn Kotlin while saving big.

👇 Click now to grab your discount and start your Kotlin journey! 👇


👉 Claim Your 34% Discount Now!

Hurry—this offer won't last forever! ⏳
Popular posts from this blog

Learn Java 8 streams with an example - print odd/even numbers from Array and List

Java Stream API - How to convert List of objects to another List of objects using Java streams?

Registration and Login with Spring Boot + Spring Security + Thymeleaf

Java, Spring Boot Mini Project - Library Management System - Download

ReactJS, Spring Boot JWT Authentication Example

Top 5 Java ORM tools - 2024

Java - Blowfish Encryption and decryption Example

Spring boot video streaming example-HTML5

Google Cloud Storage + Spring Boot - File Upload, Download, and Delete