Spring Boot + JSP - Hello World Example
In the section, we will create a project for Hello Word Example with Spring Boot and JSP.
Note
A quick side note here is that JSP has limitations on its own and even more so when combined with Spring Boot. So, we should consider the following template engines as better alternatives to JSP.
Note
A quick side note here is that JSP has limitations on its own and even more so when combined with Spring Boot. So, we should consider the following template engines as better alternatives to JSP.
Technologies used:
- Spring Boot 3.0.1
- Spring 6.0.3
- Maven
- Java 17
1. Creating a simple Spring Boot Application
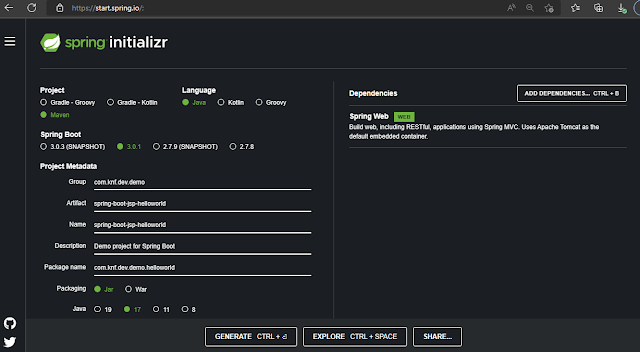
First, open the Spring initializr https://start.spring.io/ Then, Provide the Group and Artifact name. We have provided Group name com.knf.dev.demo and Artifact spring-boot-jsp-helloworld. Here I selected the Maven project - language Java - Spring Boot 3.0.1 and add Spring web dependency.
Then, click on the Generate button. When we click on the Generate button, it starts packing the project in a .zip(spring-boot-jsp-helloworld.zip) file and downloads the project. Then, Extract the Zip file.
2. Final Project Directory
3. Project Dependencies
For a Spring Boot JSP web application, we will need the following dependencies on the pom.xml file
- spring-boot-starter-web provides all the dependencies and auto-configuration we need to develop a web application in Spring Boot, including the Tomcat embedded servlet container
- tomcat-embed-jasper provides the support for compiling JSP files in Tomcat
<?xml version="1.0" encoding="UTF-8"?>
<project xmlns="http://maven.apache.org/POM/4.0.0"
       xmlns:xsi="http://www.w3.org/2001/XMLSchema-instance"
   xsi:schemaLocation="http://maven.apache.org/POM/4.0.0
   https://maven.apache.org/xsd/maven-4.0.0.xsd">
   <modelVersion>4.0.0</modelVersion>
   <parent>
      <groupId>org.springframework.boot</groupId>
      <artifactId>spring-boot-starter-parent</artifactId>
      <version>3.0.1</version>
      <relativePath/> <!-- lookup parent from repository -->
   </parent>
   <groupId>com.knf.dev.demo</groupId>
   <artifactId>spring-boot-jsp-helloworld</artifactId>
   <version>0.0.1-SNAPSHOT</version>
   <name>spring-boot-jsp-helloworld</name>
   <description>Demo project for Spring Boot</description>
   <properties>
      <java.version>17</java.version>
   </properties>
   <dependencies>
      <dependency>
         <groupId>org.springframework.boot</groupId>
         <artifactId>spring-boot-starter-web</artifactId>
      </dependency>
      <dependency>
         <groupId>org.apache.tomcat.embed</groupId>
         <artifactId>tomcat-embed-jasper</artifactId>
      </dependency>
      <dependency>
         <groupId>org.springframework.boot</groupId>
         <artifactId>spring-boot-starter-test</artifactId>
         <scope>test</scope>
      </dependency>
   </dependencies>

   <build>
      <plugins>
         <plugin>
            <groupId>org.springframework.boot</groupId>
            <artifactId>spring-boot-maven-plugin</artifactId>
         </plugin>
      </plugins>
   </build>
</project>
4. application.properties
spring.mvc.view.prefix: /WEB-INF/jsp/
spring.mvc.view.suffix: .jsp
5. HelloController.java
Create a Spring Boot controller file to map HTTP requests to JSP view files.
package com.knf.dev.demo.helloworld.controller;

import org.springframework.stereotype.Controller;
import org.springframework.ui.Model;
import org.springframework.web.bind.annotation.GetMapping;
import org.springframework.web.bind.annotation.RequestMapping;
import org.springframework.web.bind.annotation.RequestParam;

@Controller
public class HelloController {
    @GetMapping("/hello")
    public String hello(Model model,
                        @RequestParam(value="message",
                                required=false,
                          defaultValue="World") String message) {
        model.addAttribute("message", "Hello "+message);
        return "index";
    }
}
6. index.jsp
Create a simple JSP view template file to show a dynamic message to user.
<!DOCTYPE html>
<html lang="en">
<head>
    <meta charset="UTF-8">
    <title>${message}!</title>
</head>
<body>
    <h2 >${message}!</h2>
</body>
</html>
7. Run the application - Application.java
package com.knf.dev.demo.helloworld;

import org.springframework.boot.SpringApplication;
import org.springframework.boot.autoconfigure.SpringBootApplication;

@SpringBootApplication
public class Application {

   public static void main(String[] args) {
      SpringApplication.run(Application.class, args);
   }
}
Application is the entry point that sets up the Spring Boot application. The @SpringBootApplication annotation enables auto-configuration and component scanning.
Let's run this Spring boot application from either IntelliJ IDEA IDE by right click - Run 'Application.main()'
Or you can use the below maven command to run:
mvn spring-boot:runAccess
Download Source Code
Java Full stack development,


